In the realm of sewing and quilting, bias binding holds a special significance, serving as a decorative and functional finish for edges, curves, and seams. Traditionally made from folded strips of fabric, continuous bias binding allows for seamless and uninterrupted trim applications. If you’re eager to master this technique, let’s embark on a comprehensive guide to transforming a simple rectangle into this versatile embellishment.
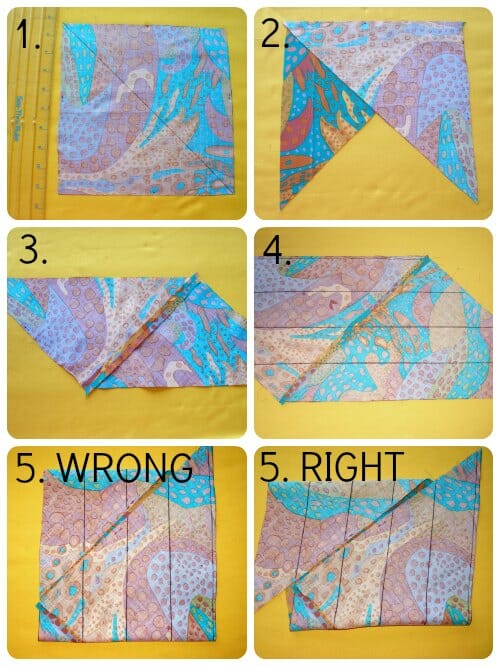
Image: so-sew-easy.com
The Essence of Continuous Bias Binding
Bias binding derives its name from the angled orientation of the fabric grain, which runs diagonally to the selvage or edge. This unique orientation imparts inherent stretchiness, making it ideal for conforming to curves and irregular shapes without puckering or distorting. Bias binding is not merely an aesthetic element but also serves a practical purpose, protecting raw fabric edges from fraying and wear over time.
A Step-by-Step Transformation: Crafting Continuous Bias Binding from a Rectangle
Materials you’ll need:
-
Rectangular fabric of desired width and length
-
Iron and ironing board
-
Sewing machine with a walking foot (optional)
Instructions:
-
Preparing the Fabric: Cut a rectangular piece of fabric with a diagonal length equivalent to half the finished binding width plus twice the desired seam allowance. For instance, to create a 1-inch wide bias binding with a ¼-inch seam allowance, cut the fabric 3 inches wide and 90 inches long.
-
Ironing the Bias: Fold the fabric diagonally in half, bringing the raw edges together and aligning them precisely. Press the crease flat with an iron. Unfold the fabric and press both raw edges perpendicular to the center crease, forming a neat and stable “V” shape.
-
Joining the Ends: Overlap the short ends of the bias by 1 inch, ensuring the edges match up. Stitch the ends together using a narrow zigzag stitch or a straight stitch, depending on the desired finish. Trim any excess fabric.
-
Finishing the Continuous Loop: Insert the sewn end into the open end of the bias and carefully pull it through, creating a continuous loop of binding. Press the binding flat to set the seam.
Congratulations! You’ve successfully turned a rectangle into continuous bias binding, ready to enhance your sewing projects with elegance and durability.
Practical Applications of Continuous Bias Binding
-
Quilting: Enrich your quilts with neat and sturdy edges that prevent fabric fraying and add a decorative touch.
-
Curved Edges: Embrace the versatility of bias binding for finishing curved seams and intricate shapes without compromising on quality.
-
Lace Inserts: Elevate the look of your clothing or accessories by incorporating lace or other delicate fabric as the binding material.
-
Secure Cords: Add a touch of functionality to your projects by concealing cords and wires within the bias binding, providing a neat and professional finish.
-
Fashion Accents: Unleash your creativity by using contrasting or complementary colors and patterns of bias binding as eye-catching embellishments on garments, bags, and home décor items.

Image: www.pinterest.com
How To Make Continuous Bias Binding From A Rectangle
Conclusion
Mastering the art of making continuous bias binding from a rectangle opens up a world of creative possibilities in sewing and quilting. By following the detailed steps outlined above, you can effortlessly transform ordinary fabric into an indispensable tool that enhances the durability, aesthetics, and versatility of your projects. So, pick up your rectangular fabrics and embark on this rewarding journey of handcrafted embellishment.


