Have you ever found yourself craving a tantalizing treat but lacking an oven? Introducing the delectable solution: Oreo Mug Cake! This culinary masterpiece combines the beloved taste of Oreos with the convenience of a microwave to create an instant, heavenly delight. Join us as we delve into the scrumptious world of Oreo Mug Cake, unveiling its history, techniques, and irresistible flavors.

Image: www.godairyfree.org
In a culinary landscape dominated by elaborate multi-tiered cakes, the Oreo Mug Cake stands out as a beacon of simplicity and indulgence. Its origins can be traced back to the early 2000s, when microwave cooking gained popularity as a quick and easy alternative to traditional baking. The versatility of this kitchen appliance paved the way for countless mug recipes, including the now-ubiquitous Oreo Mug Cake.
The essence of an Oreo Mug Cake lies in its effortless preparation. With a microwave as your trusty companion, you can transform everyday ingredients into a chocolatey masterpiece. Its compact size makes it an ideal treat for those living in dorms, studios, or any space with limited kitchen facilities. Whether you’re a seasoned baker or a novice in the culinary realm, the Oreo Mug Cake promises an accessible and delicious experience.
Unveiling the Ingredients: A Symphony of Delectable Delights
To embark on the Oreo Mug Cake adventure, you will require an orchestra of fundamental ingredients:
- Oreos: The indisputable star of the show, providing the signature chocolatey crunch and flavor that defines this beloved treat.
- Flour: An unsung hero, providing structure and texture to prevent your cake from becoming a gooey mess.
- Sugar: The sweetener that balances the bitterness of the cocoa and enhances the overall flavor profile.
- Baking powder: The secret ingredient that magically transforms your batter into a fluffy, moist cake.
- Milk: The magical liquid that brings all the dry ingredients together, creating a smooth and velvety consistency.
- Butter: An optional indulgence that adds richness and moisture to the cake. Its presence elevates the taste experience to new heights.
Crafting the Perfect Mug Cake: A Step-by-Step Guide
With the stage set and your ingredients ready, let’s embark on the captivating journey of crafting the perfect Oreo Mug Cake:
- Prepare the Stage: Microwave a suitable mug for 10-15 seconds to warm it up. This extra step ensures even cooking and prevents your cake from sticking.
- Orchestrate the Dry Symphony: In the warmed mug, combine the flour, sugar, and baking powder. Using a fork or small whisk, stir these ingredients vigorously until they form a homogeneous blend.
- Incorporate the Oreo Ensemble: The moment we’ve all been waiting for! Take your Oreos and separate them into two groups: one for crushing and one for garnishing. Finely crush the first group in a bowl or using a fork and add them to the mug. Gently mix to integrate them into the dry ingredients.
- Introduce the Liquid Elements: Now, it’s time to bring the batter to life. Pour in the milk and melted butter (if using). Stir the mixture thoroughly until a smooth, lump-free batter forms.
- Microwaving Rhapsody: Place the mug in the center of your microwave and cook at full power for 1-2 minutes. The timing may vary slightly depending on your microwave’s wattage, so keep a watchful eye to avoid overcooking.
- Unveiling the Masterpiece: Remove the mug from the microwave and let it cool for a few minutes before digging in. Decorate the cake with the remaining Oreo halves for an extra touch of elegance.
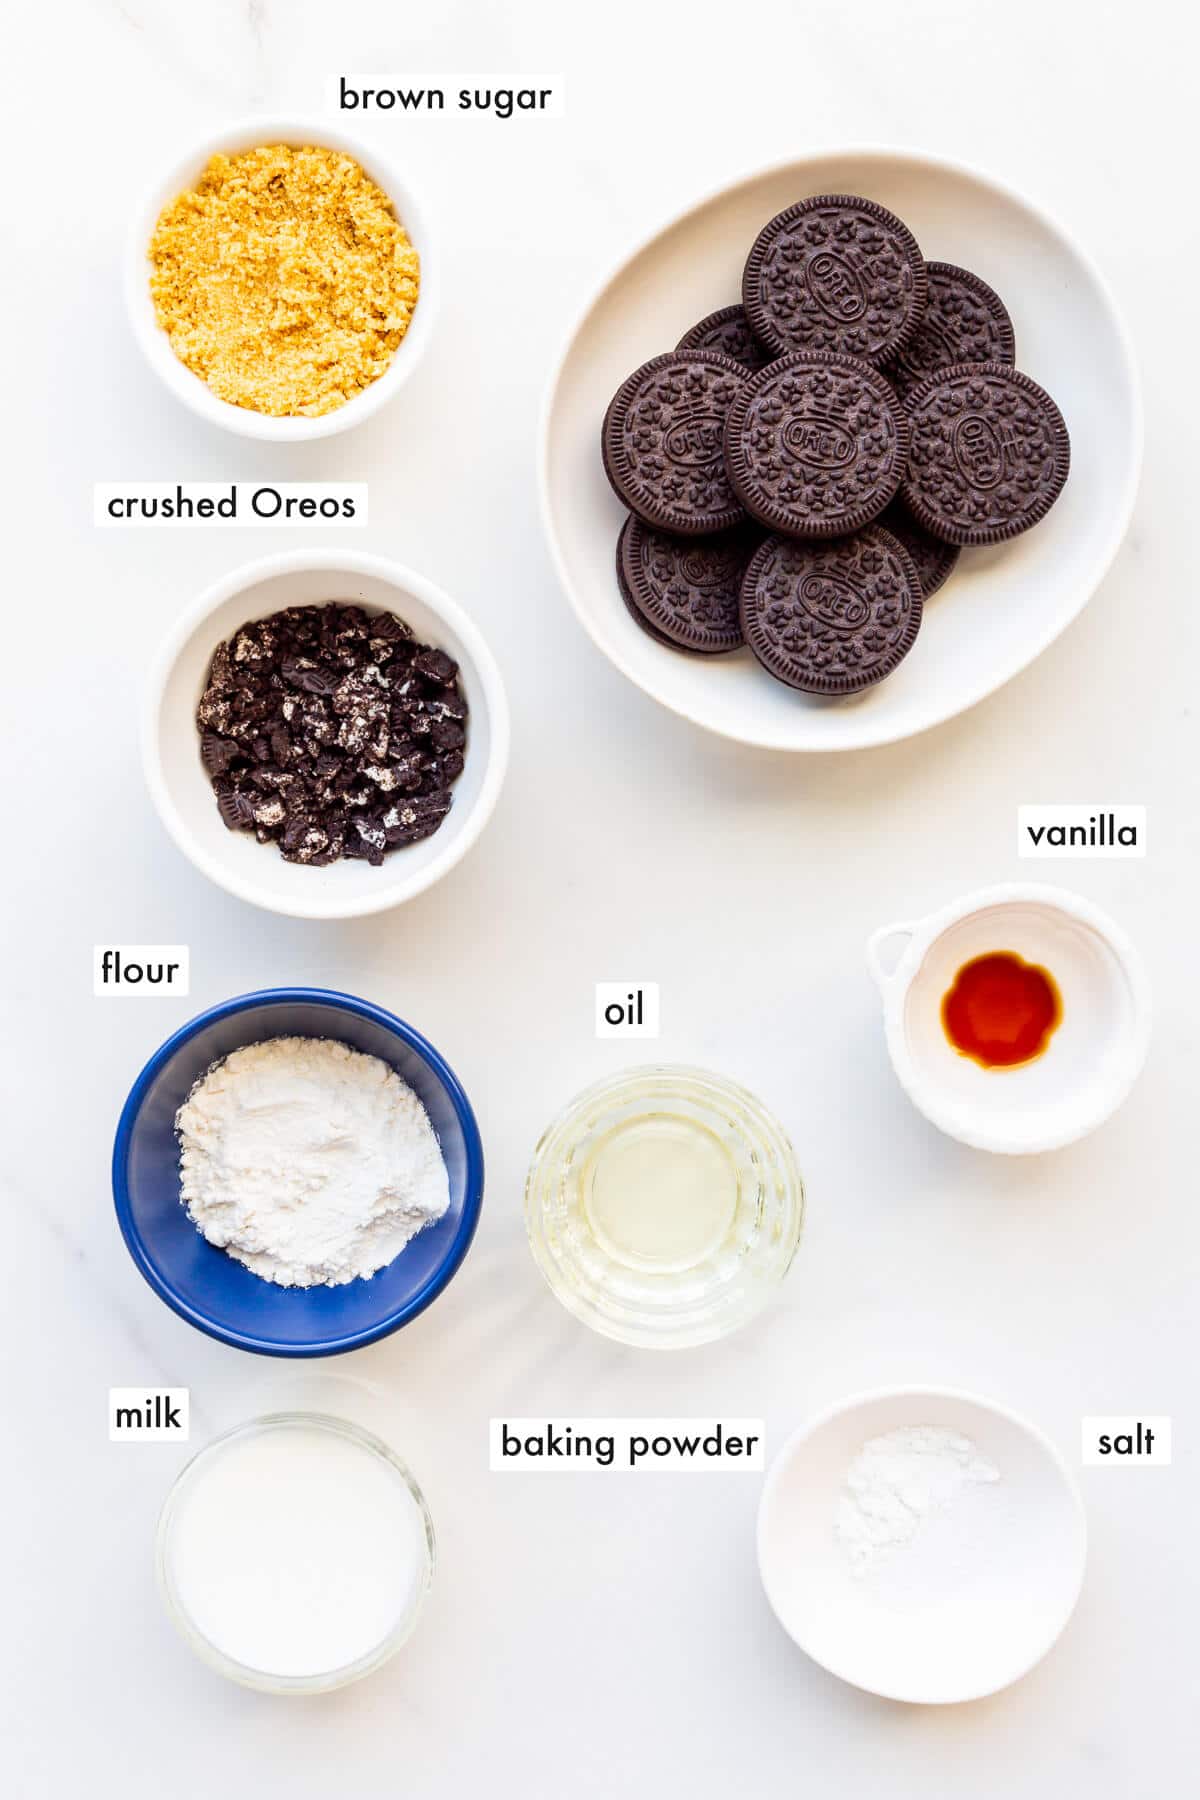
Image: bakeschool.com
How To Make Oreo Cake In A Mug
Variations: A Universe of Oreo Mug Cake Explorations
The beauty of the Oreo Mug Cake lies in its versatility. You can customize it to suit your preferences and dietary restrictions, creating endless variations:
- Gluten-Free Symphony:** For those with gluten sensitivities, simply replace the regular flour with your preferred gluten-free flour blend.
- Vegan Delight:** To create a vegan version, substitute the milk with plant-based milk, such as almond or soy milk, and ensure the butter is vegan.
- Chocolate Indulgence: Enhance the chocolatey goodness by adding a tablespoon of cocoa powder to the dry ingredients. You can also drizzle melted chocolate on top of the finished cake for an extra-rich treat.
- Berry Medley:** For a fruity twist, fold in fresh or frozen berries, such as blueberries, raspberries, or strawberries, into the batter. The burst of sweetness and color will elevate your cake to new


